Spring整合JDBC和Druid连接池
我的博客名为黑客之谜,喜欢我的,或者喜欢未来的大神,点一波关注吧!顺便说一下,双十二快到了,祝大家双十二快乐,尽情的买买买~
如果转载我的文章请标明出处和著名,谢谢配合。
我的博客地址为: https://www.cnblogs.com/themysteryofhackers/p/12021646.html
更新时间为:2019-12-11
一、创建Maven项目
如何创建Maven项目的步骤我就不再论述了,忘记的话就看会我上一篇博客吧!
二、导入项目的依赖
导入的依赖如下:
<properties>
        <spring.version>4.3.12.RELEASE</spring.version>
    </properties>
    <dependencies>
        <!-- https://mvnrepository.com/artifact/org.springframework/spring-context -->
        <dependency>
            <groupId>org.springframework</groupId>
            <artifactId>spring-context</artifactId>
            <version>${spring.version}</version>
        </dependency>
        <!-- spring aop支持 -->
        <dependency>
            <groupId>org.springframework</groupId>
            <artifactId>spring-aop</artifactId>
            <version>${spring.version}</version>
        </dependency>
        <!-- aspectj支持 -->
        <dependency>
            <groupId>org.aspectj</groupId>
            <artifactId>aspectjweaver</artifactId>
            <version>1.8.7</version>
        </dependency>
        <dependency>
            <groupId>org.springframework</groupId>
            <artifactId>spring-jdbc</artifactId>
            <version>${spring.version}</version>
        </dependency>
        <!-- 添加MySQL数据库驱动依赖包. -->
        <dependency>
            <groupId>mysql</groupId>
            <artifactId>mysql-connector-java</artifactId>
            <version>5.1.30</version>
        </dependency>
        <!-- druid 连接池 -->
        <dependency>
            <groupId>com.alibaba</groupId>
            <artifactId>druid</artifactId>
            <version>1.0.18</version>
        </dependency>
        <dependency>
            <groupId>junit</groupId>
            <artifactId>junit</artifactId>
            <version>4.12</version>
            <scope>test</scope>
        </dependency>
    </dependencies>
    <build>
        <plugins>
            <plugin>
                <groupId>org.apache.maven.plugins</groupId>
                <artifactId>maven-compiler-plugin</artifactId>
                <configuration>
                    <!-- 代码检错版本号 -->
                    <source>1.8</source>
                    <!-- 代码编译版本号 -->
                    <target>1.8</target>
                    <!--项目字符集 -->
                    <encoding>UTF-8</encoding>
                </configuration>
            </plugin>
        </plugins>
    </build>
三、创建包和类
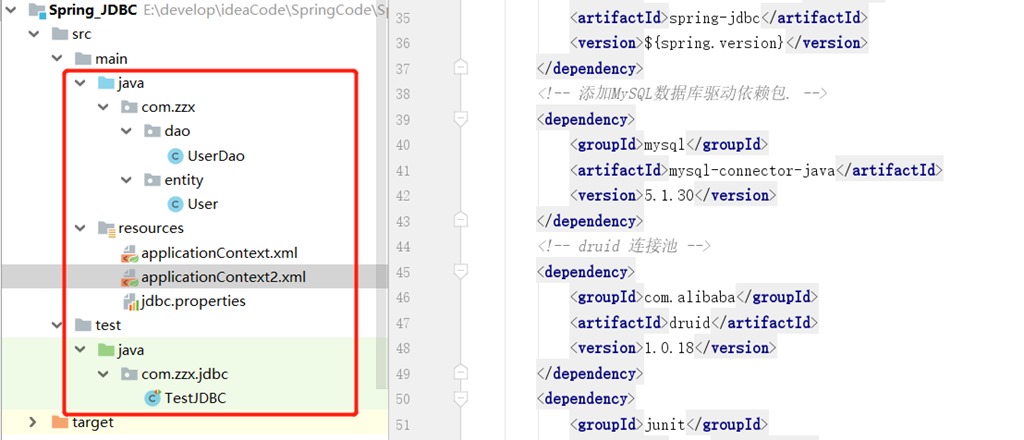
导入依赖之后,就创建包、类和配置文件,具体文件如下图:
User.java
package com.zzx.entity;

import java.util.Date;

public class User {
    private Integer id;
    private String name;
    private String password;
    private String email;
    private Integer age;
    private Integer sex;
    private Date birth;
    private Integer state;

    public Integer getId() {
        return id;
    }

    public void setId(Integer id) {
        this.id = id;
    }

    public String getName() {
        return name;
    }

    public String getEmail() {
        return email;
    }

    public void setEmail(String email) {
        this.email = email;
    }

    public void setName(String name) {
        this.name = name;
    }

    public String getPassword() {
        return password;
    }

    public void setPassword(String password) {
        this.password = password;
    }

    public Integer getAge() {
        return age;
    }

    public void setAge(Integer age) {
        this.age = age;
    }

    public Integer getSex() {
        return sex;
    }

    public void setSex(Integer sex) {
        this.sex = sex;
    }

    public Date getBirth() {
        return birth;
    }

    public void setBirth(Date birth) {
        this.birth = birth;
    }

    public Integer getState() {
        return state;
    }

    public void setState(Integer state) {
        this.state = state;
    }

    @Override
    public String toString() {
        return "User{" +
                "id=" + id +
                ", name='" + name + '\'' +
                ", password='" + password + '\'' +
                ", email='" + email + '\'' +
                ", age=" + age +
                ", sex=" + sex +
                ", birth=" + birth +
                ", state=" + state +
                '}';
    }
}
UserDao.java
package com.zzx.dao;

import com.zzx.entity.User;
import org.springframework.beans.factory.annotation.Autowired;
import org.springframework.jdbc.core.BeanPropertyRowMapper;
import org.springframework.jdbc.core.JdbcTemplate;
import org.springframework.stereotype.Repository;

import java.util.List;

//将该对象交给spring容器管理
@Repository("userDao")
public class UserDao {
    @Autowired
    private JdbcTemplate jdbcTemplate;

    public List<User> selectAll(){
        String sql="select * from user";
        return jdbcTemplate.query(sql,new BeanPropertyRowMapper<User>(User.class));
    }


}
applicationContext.xml
<?xml version="1.0" encoding="UTF-8"?>
<beans xmlns="http://www.springframework.org/schema/beans"
       xmlns:xsi="http://www.w3.org/2001/XMLSchema-instance"
       xmlns:aop="http://www.springframework.org/schema/aop"
       xmlns:context="http://www.springframework.org/schema/context"
       xmlns:tx="http://www.springframework.org/schema/tx"
       xsi:schemaLocation="http://www.springframework.org/schema/beans
                http://www.springframework.org/schema/beans/spring-beans-4.3.xsd
                http://www.springframework.org/schema/context
                http://www.springframework.org/schema/context/spring-context-4.3.xsd
                http://www.springframework.org/schema/aop
                http://www.springframework.org/schema/aop/spring-aop-4.3.xsd">
    <!-- 扫描包 -->
    <context:component-scan base-package="com.zzx.dao" />
    <!-- 引入属性文件,数据配置信息文件,引入后就可以通过EL表达式获取该文件的内容 -->
    <context:property-placeholder location="classpath:jdbc.properties" />
    <bean id="dataSource" class="org.springframework.jdbc.datasource.DriverManagerDataSource">
        <property name="driverClassName" value="${spring.datasource.driver-class-name}" />
        <property name="url" value="${spring.datasource.url}" />
        <property name="username" value="${spring.datasource.username}" />
        <property name="password" value="${spring.datasource.password}" />
    </bean>
    <!-- 这是spring提供的一个操作数据库的工具类 ,以为它要用到dataSource,所以要在属性上配上dataSource -->
    <bean id="jdbcTemplate" class="org.springframework.jdbc.core.JdbcTemplate">
        <property name="dataSource" ref="dataSource"></property>
    </bean>
</beans>
jdbc.properties
spring.datasource.driver-class-name=com.mysql.jdbc.Driver
spring.datasource.url=jdbc:mysql://localhost:3306/testdb?useunicode=true&characterEncoding=utf8
spring.datasource.username=root
spring.datasource.password=123456
TestJDBC.java
package com.zzx.jdbc;

import com.zzx.dao.UserDao;
import com.zzx.entity.User;
import org.junit.Test;
import org.springframework.context.support.ClassPathXmlApplicationContext;

import java.util.List;

public class TestJDBC {
    @Test
    public void testJDBC(){
        ClassPathXmlApplicationContext applicationContext = new ClassPathXmlApplicationContext("applicationContext.xml");
        UserDao userDao = applicationContext.getBean("userDao", UserDao.class);
        List<User> users = userDao.selectAll();
        for (User user : users) {
            System.out.println(user);
        }
    }
    @Test
    public void testDruid(){
        ClassPathXmlApplicationContext applicationContext = new ClassPathXmlApplicationContext("applicationContext2.xml");
        UserDao userDao = applicationContext.getBean("userDao", UserDao.class);
        List<User> users = userDao.selectAll();
        for (User user : users) {
            System.out.println(user);
        }
    }
}
四、运行程序
先运行TestJDBC.java中的testJDBC()方法,结果如下:
五、整合Druid连接池
整合Druid连接池先要导入Druid的依赖,上面到依赖的时候就已经导入了,然后将applicationContext.xml文件里面的内容换成下面的内容即可,然后在测试类中,在写一个测试的方法(上面已经给出了),
applicationContext2.xml
<?xml version="1.0" encoding="UTF-8"?>
<beans xmlns="http://www.springframework.org/schema/beans"
       xmlns:xsi="http://www.w3.org/2001/XMLSchema-instance"
       xmlns:aop="http://www.springframework.org/schema/aop"
       xmlns:context="http://www.springframework.org/schema/context"
       xmlns:tx="http://www.springframework.org/schema/tx"
       xsi:schemaLocation="http://www.springframework.org/schema/beans
                http://www.springframework.org/schema/beans/spring-beans-4.3.xsd
                http://www.springframework.org/schema/context
                http://www.springframework.org/schema/context/spring-context-4.3.xsd
                http://www.springframework.org/schema/aop
                http://www.springframework.org/schema/aop/spring-aop-4.3.xsd">
    <!-- 扫描包 -->
    <context:component-scan base-package="com.zzx.dao" />
    <!-- 引入属性文件,数据配置信息文件,引入后就可以通过EL表达式获取该文件的内容 -->
    <context:property-placeholder location="classpath:jdbc.properties" />

    <!-- 指定数据源 -->
    <bean id="dataSource" class="com.alibaba.druid.pool.DruidDataSource" init-method="init"
          destroy-method="close">
        <!-- 基本属性 url、user、password -->
        <property name="driverClassName" value="${spring.datasource.driver-class-name}" />
        <property name="url" value="${spring.datasource.url}" />
        <property name="username" value="${spring.datasource.username}" />
        <property name="password" value="${spring.datasource.password}" />
        <!-- 配置监控统计拦截的filters -->
        <property name="filters" value="stat" />
        <!-- 配置初始化大小、最小、最大 -->
        <property name="maxActive" value="20" />
        <property name="initialSize" value="1" />
        <property name="minIdle" value="1" />

        <!-- 配置获取连接等待超时的时间 -->
        <property name="maxWait" value="60000" />

        <!-- 配置间隔多久才进行一次检测,检测需要关闭的空闲连接,单位是毫秒 -->
        <property name="timeBetweenEvictionRunsMillis" value="60000" />

        <!-- 配置一个连接在池中最小生存的时间,单位是毫秒 -->
        <property name="minEvictableIdleTimeMillis" value="300000" />

        <property name="testWhileIdle" value="true" />
        <property name="testOnBorrow" value="false" />
        <property name="testOnReturn" value="false" />

        <!-- 打开PSCache,并且指定每个连接上PSCache的大小 -->
        <property name="poolPreparedStatements" value="true" />
        <property name="maxOpenPreparedStatements" value="20" />
    </bean>

    <!-- 这是spring提供的一个操作数据库的工具类 ,以为它要用到dataSource,所以要在属性上配上dataSource -->
    <bean id="jdbcTemplate" class="org.springframework.jdbc.core.JdbcTemplate">
        <property name="dataSource" ref="dataSource"></property>
    </bean>
</beans>
运行testDruid方法,结果是和上面使用jdbc运行的一样的,但使用了连接池好处多多,比如可以让资源重复利用,不用每次访问数据库的时候都要创建一个连接,访问结束就销毁这个链接,这样就可以看出使用连接池还可以提高系统的反应速度,毕竟创建连接和销毁链接都是要时间的。如果还想了解连接池的好处,自己可以去学习一下。
结尾
我是一个Java程序员,一个向往技术的小白,以后我会陆续将自己学习到的Java或者其他的知识会以博客的形式分享出来,希望能对大家有帮助。
喜欢小编的就给我一个关注吧!
如果有哪些问题、有哪些需要纠错或者侵犯到您的权益的地方,可以联系我,我进行修改。
原文地址:https://www.cnblogs.com/themysteryofhackers/p/12021646.html
- 分享超炫的表白页面和爱的纪念日源码
- 分享WordPress Mobile Pack汉化精简版及隐藏指定插件更新提示的方法
- Tomcat重启脚本For Windows
- js获取url中?后的参数,修复移动版无法切换到电脑版的BUG
- nginx配置文件参数详解
- LVS中Windows作为真实主机(RealServer)时的设置方法
- 菜鸟教程:Ngnix安装详解
- 教你如何去掉友荐和无觅的隐藏外链和版权链接
- 重置多说配置后的问题,这是不让我从良的节奏啊(附禁用谷歌在线字体的方法)!
- 10个超有趣的Linux命令
- 张戈博客惊现WordPress恶意代码,各位WP博主要注意下了!
- 分享一个多说头像的动态酷炫CSS样式
- 在Linux中发现IP地址冲突的方法
- 教你如何查看Linux的CPU负载
- java教程
- Java快速入门
- Java 开发环境配置
- Java基本语法
- Java 对象和类
- Java 基本数据类型
- Java 变量类型
- Java 修饰符
- Java 运算符
- Java 循环结构
- Java 分支结构
- Java Number类
- Java Character类
- Java String类
- Java StringBuffer和StringBuilder类
- Java 数组
- Java 日期时间
- Java 正则表达式
- Java 方法
- Java 流(Stream)、文件(File)和IO
- Java 异常处理
- Java 继承
- Java 重写(Override)与重载(Overload)
- Java 多态
- Java 抽象类
- Java 封装
- Java 接口
- Java 包(package)
- Java 数据结构
- Java 集合框架
- Java 泛型
- Java 序列化
- Java 网络编程
- Java 发送邮件
- Java 多线程编程
- Java Applet基础
- Java 文档注释
- 牛X | 一款比传统数据库快100-1000倍的数据库,认识一下
- SpringBoot统一参数校验
- SpringBoot多邮件源发送邮件
- 一个基础的SpringBoot项目该包含哪些
- leetcode树之平衡二叉树
- 3分钟短文:说说Laravel页面会话之间的数据保存Session用法
- Skywalking Php注册不上问题排查
- 第4章代码-图形几何变换
- 第5章代码-三维观察
- 我的2020 九月iOS面试秘籍,为你的跳槽保驾护航
- SAP Spartacus layout设计原理
- Angular依赖注入的一个例子和注入原理单步调试
- Angular依赖注入的一个常见错误NullInjectorError,No provider for XXX
- Redis系列(十二)scan Info Object等特殊命令集合
- 使用纯CSS给网站文章中的外链添加小图标