labelme的安装及生成json后批处理
一、 labelme的安装
1、 打开anaconda prompt,先在Anaconda中新建了一个虚拟环境,作为我的一个标注环境。
conda create -n my_labelme python==3.7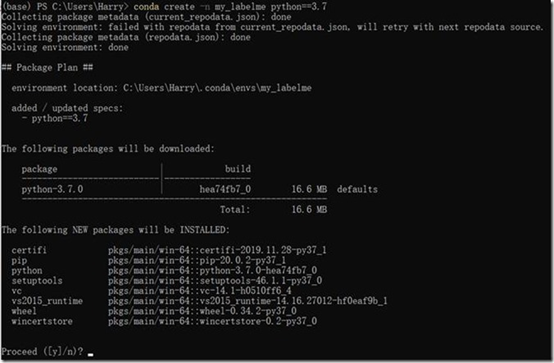
2、 安装labelme
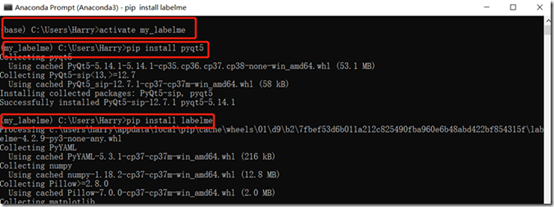
首先激活环境
activate my-labelme
然后先安装pyqt5
pip install pyqt5
安装好后安装labelme
pip install labelme
二、使用labelme
直接在激活后的环境内输入labelme可以弹出窗口进行操作,具体的使用教程有很多不错的资料,不画蛇添足了。
三、label生成的json文件转png
我们标注完成后会生成相应的json文件,文件里有label的详细信息。生成的json文件并不能直接用,我们需要对他进行处理才能变为需要形式。
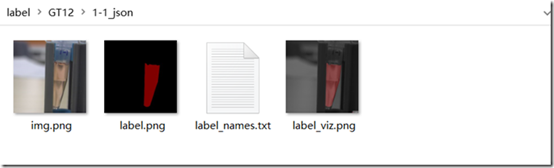
1、单个json文件的转换,这里我生成的json文件名为1-1.json,位于C:\Users\Harry\Desktop\label\GT12目录下,在激活my_labelme环境的anaconda prompt中,直接输入
labelme_json_to_dataset C:\Users\Harry\Desktop\label\GT12\1-1.json
运行后可以在json文件所在文件夹下,生成一个文件夹,文件夹中有对应的4个生成文件。
2、labelme标注工具再转化.json文件有一个缺陷,一次只能转换一个.json文件,我们通常需要大量的数据,可以对labelme做出了改进,可以实现批量转换.json文件。
①找到虚拟环境的安装位置,具体的位置和系统有一些关系,以我电脑为例,一般在C:\Users\Harry\.conda\envs\****或者 C:\ProgramData\Anaconda3\envs\**** 中。
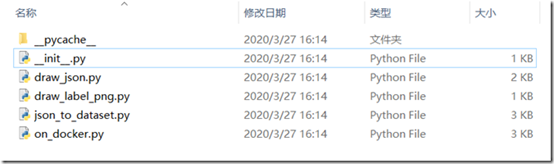
②按照自己路径进入cli文件夹,我的是 C:\ProgramData\Anaconda3\envs\labelme\Lib\site-packages\labelme\cli
③共有四个.py 文件,我们备份一下,然后更改json_to_dataset.py中的文件,文件中内容如下:
import argparse
import json
import os
import os.path as osp
import warnings
import numpy as np
import PIL.Image
import yaml
from labelme import utils
def main():
    parser = argparse.ArgumentParser()
    parser.add_argument('json_file')
    parser.add_argument('-o', '--out', default=None)
    args = parser.parse_args()
    json_file = args.json_file
    list = os.listdir(json_file)
    for i in range(0, len(list)):
        path = os.path.join(json_file, list[i])
        if os.path.isfile(path):
            data = json.load(open(path))
            img = utils.img_b64_to_arr(data['imageData'])
            lbl, lbl_names = utils.labelme_shapes_to_label(img.shape, data['shapes'])
            captions = ['%d: %s' % (l, name) for l, name in enumerate(lbl_names)]
            lbl_viz = utils.draw_label(lbl, img, captions)
            out_dir = osp.basename(list[i]).replace('.', '_')
            out_dir = osp.join(osp.dirname(list[i]), out_dir)
            if not osp.exists(out_dir):
                os.mkdir(out_dir)
            PIL.Image.fromarray(img).save(osp.join(out_dir, 'img.png'))
            PIL.Image.fromarray(lbl).save(osp.join(out_dir, 'label.png'))
            PIL.Image.fromarray(lbl_viz).save(osp.join(out_dir, 'label_viz.png'))
            with open(osp.join(out_dir, 'label_names.txt'), 'w') as f:
                for lbl_name in lbl_names:
                    f.write(lbl_name + '\n')
            warnings.warn('info.yaml is being replaced by label_names.txt')
            info = dict(label_names=lbl_names)
            with open(osp.join(out_dir, 'info.yaml'), 'w') as f:
                yaml.safe_dump(info, f, default_flow_style=False)
            print('Saved to: %s' % out_dir)
if __name__ == '__main__':
    main()
④假设我的json文件放在d:\my_jsondata中,生成的文件我想放到d:\my_data中
这个时候就可以使用,就可以看到生成的文件里
#先进入存储生成文件的文件夹
cd D:\my_jsondata
#运行
labelme_json_to_dataset d:\my_data
但是这个时候运行,一般会出现这个错误,显示缺少draw_label,这个应该是版本的原因,最新版本缺少了这个文件。
这个坑我填了好久…
⑤在envs\my_labelme\Lib\site-packages\labelme\utils中添加draw.py,内容如下:
import io
import os.path as osp

import numpy as np
import PIL.Image
import PIL.ImageDraw
import PIL.ImageFont


def label_colormap(N=256):

    def bitget(byteval, idx):
        return ((byteval & (1 << idx)) != 0)

    cmap = np.zeros((N, 3))
    for i in range(0, N):
        id = i
        r, g, b = 0, 0, 0
        for j in range(0, 8):
            r = np.bitwise_or(r, (bitget(id, 0) << 7 - j))
            g = np.bitwise_or(g, (bitget(id, 1) << 7 - j))
            b = np.bitwise_or(b, (bitget(id, 2) << 7 - j))
            id = (id >> 3)
        cmap[i, 0] = r
        cmap[i, 1] = g
        cmap[i, 2] = b
    cmap = cmap.astype(np.float32) / 255
    return cmap


def _validate_colormap(colormap, n_labels):
    if colormap is None:
        colormap = label_colormap(n_labels)
    else:
        assert colormap.shape == (colormap.shape[0], 3), \
            'colormap must be sequence of RGB values'
        assert 0 <= colormap.min() and colormap.max() <= 1, \
            'colormap must ranges 0 to 1'
    return colormap


# similar function as skimage.color.label2rgb
def label2rgb(
    lbl, img=None, n_labels=None, alpha=0.5, thresh_suppress=0, colormap=None,
):
    if n_labels is None:
        n_labels = len(np.unique(lbl))

    colormap = _validate_colormap(colormap, n_labels)
    colormap = (colormap * 255).astype(np.uint8)

    lbl_viz = colormap[lbl]
    lbl_viz[lbl == -1] = (0, 0, 0)  # unlabeled

    if img is not None:
        img_gray = PIL.Image.fromarray(img).convert('LA')
        img_gray = np.asarray(img_gray.convert('RGB'))
        # img_gray = cv2.cvtColor(img, cv2.COLOR_RGB2GRAY)
        # img_gray = cv2.cvtColor(img_gray, cv2.COLOR_GRAY2RGB)
        lbl_viz = alpha * lbl_viz + (1 - alpha) * img_gray
        lbl_viz = lbl_viz.astype(np.uint8)

    return lbl_viz


def draw_label(label, img=None, label_names=None, colormap=None, **kwargs):
    """Draw pixel-wise label with colorization and label names.

    label: ndarray, (H, W)
        Pixel-wise labels to colorize.
    img: ndarray, (H, W, 3), optional
        Image on which the colorized label will be drawn.
    label_names: iterable
        List of label names.
    """
    import matplotlib.pyplot as plt

    backend_org = plt.rcParams['backend']
    plt.switch_backend('agg')

    plt.subplots_adjust(left=0, right=1, top=1, bottom=0,
                        wspace=0, hspace=0)
    plt.margins(0, 0)
    plt.gca().xaxis.set_major_locator(plt.NullLocator())
    plt.gca().yaxis.set_major_locator(plt.NullLocator())

    if label_names is None:
        label_names = [str(l) for l in range(label.max() + 1)]

    colormap = _validate_colormap(colormap, len(label_names))

    label_viz = label2rgb(
        label, img, n_labels=len(label_names), colormap=colormap, **kwargs
    )
    plt.imshow(label_viz)
    plt.axis('off')

    plt_handlers = []
    plt_titles = []
    for label_value, label_name in enumerate(label_names):
        if label_value not in label:
            continue
        fc = colormap[label_value]
        p = plt.Rectangle((0, 0), 1, 1, fc=fc)
        plt_handlers.append(p)
        plt_titles.append('{value}: {name}'
                          .format(value=label_value, name=label_name))
    plt.legend(plt_handlers, plt_titles, loc='lower right', framealpha=.5)

    f = io.BytesIO()
    plt.savefig(f, bbox_inches='tight', pad_inches=0)
    plt.cla()
    plt.close()

    plt.switch_backend(backend_org)

    out_size = (label_viz.shape[1], label_viz.shape[0])
    out = PIL.Image.open(f).resize(out_size, PIL.Image.BILINEAR).convert('RGB')
    out = np.asarray(out)
    return out


def draw_instances(
    image=None,
    bboxes=None,
    labels=None,
    masks=None,
    captions=None,
):
    import matplotlib

    # TODO(wkentaro)
    assert image is not None
    assert bboxes is not None
    assert labels is not None
    assert masks is None
    assert captions is not None

    viz = PIL.Image.fromarray(image)
    draw = PIL.ImageDraw.ImageDraw(viz)

    font_path = osp.join(
        osp.dirname(matplotlib.__file__),
        'mpl-data/fonts/ttf/DejaVuSans.ttf'
    )
    font = PIL.ImageFont.truetype(font_path)

    colormap = label_colormap(255)
    for bbox, label, caption in zip(bboxes, labels, captions):
        color = colormap[label]
        color = tuple((color * 255).astype(np.uint8).tolist())

        xmin, ymin, xmax, ymax = bbox
        draw.rectangle((xmin, ymin, xmax, ymax), outline=color)
        draw.text((xmin, ymin), caption, font=font)

    return np.asarray(viz)
⑥修改__init__.py中的内容
添加几行
from .draw import label_colormap
from .draw import _validate_colormap
from .draw import label2rgb
from .draw import draw_label
from .draw import draw_instances
原文地址:https://www.cnblogs.com/wanghairui/p/12583686.html
- 代码注入技术Process Doppelgänging利用介绍
- 安卓手机如何玩转动作手势检测?有TensorFlow就够了,附实用教程
- 网秦更名凌动智行 域名nq.com惹关注
- 机器人索菲亚:有学习创造力、同理心和同情心
- 数控宏程序的编程及应用
- Linux常用软件安装总结
- 区块链技术到底是什么?为什么连国家都写入了“十三五规划”当中
- 使用JavaScript开发一个自修改代码
- 你适合从事数据分析吗?
- 使用VBA创建Access数据表
- 新时代已经来临,你做好准备了吗?
- Python自学笔记——多线程微信文章爬取
- 习近平要求加快这项技术发展 与你关系很密切!
- 趴比库获数百万元融资 域名pabiku.com给力十足
- JavaScript 教程
- JavaScript 编辑工具
- JavaScript 与HTML
- JavaScript 与Java
- JavaScript 数据结构
- JavaScript 基本数据类型
- JavaScript 特殊数据类型
- JavaScript 运算符
- JavaScript typeof 运算符
- JavaScript 表达式
- JavaScript 类型转换
- JavaScript 基本语法
- JavaScript 注释
- Javascript 基本处理流程
- Javascript 选择结构
- Javascript if 语句
- Javascript if 语句的嵌套
- Javascript switch 语句
- Javascript 循环结构
- Javascript 循环结构实例
- Javascript 跳转语句
- Javascript 控制语句总结
- Javascript 函数介绍
- Javascript 函数的定义
- Javascript 函数调用
- Javascript 几种特殊的函数
- JavaScript 内置函数简介
- Javascript eval() 函数
- Javascript isFinite() 函数
- Javascript isNaN() 函数
- parseInt() 与 parseFloat()
- escape() 与 unescape()
- Javascript 字符串介绍
- Javascript length属性
- javascript 字符串函数
- Javascript 日期对象简介
- Javascript 日期对象用途
- Date 对象属性和方法
- Javascript 数组是什么
- Javascript 创建数组
- Javascript 数组赋值与取值
- Javascript 数组属性和方法
- 【Vue进阶】——如何实现组件属性透传?
- Go语言入门(九) 文件操作
- zookeeper完整详细版
- redis学习(十九)
- Android开发6年,互联网寒冬公司倒闭后,耗时3个月北上广求职,终拿到头条Offer!
- 直播软件开发如何使用FFMPEG推流并保存在本地
- react-router学习笔记
- 尤大 3 天前发在 GitHub 上的 vue-lit 是啥?
- BFE.dev前端刷题 23. 实现一个sum()方法
- 彻底深刻理解js原型链之prototype,proto以及constructor(一)
- SAP Spartacus取cart的HTTP请求
- 记一次Netty连接池FixedChannelPool连接未释放问题的排查总结
- 神经网络中的蒸馏技术,从Softmax开始说起
- NullInjectorError R3InjectorError(AppModule)[StoreFeatureModule]
- Angular module加载的原理研究